Why one PDF, and what to check before combining
Some forms have only one upload field, so all of the photos must go into one file. This tool adds one page per photo in list order, so the order in your list becomes the page order of the file you submit. Requirements differ from form to form, so check the submission instructions first.
If you change the order after creating the PDF, you have to create it again, so settle the order and orientation first. The number on the left of each row counts every row, including files that couldn’t be opened. While any photo is still being checked, the Create PDF button stays disabled, so wait until the checks finish.
- Compare the number and thumbnail of each row with the order your form requires.
- A sideways thumbnail means the photo will also be sideways in the PDF, and this tool can’t rotate photos. Rotate it in your photo app, remove the old row with the ✕ button, and add the rotated photo again.
- Photos you add again go to the end of the list, so move them into place with the arrow buttons.
- Remove rows that show an error, since they are left out of the PDF, and then check the numbers again.
How paper, margin and fit are decided
Paper is A4 portrait (the default), A4 landscape, or Match photo size. FileFit sets an A4 page to 595.28 × 841.89 points, which is 210 × 297 mm, and landscape swaps the two values. Match photo size keeps each photo’s proportions and scales its long side to 841.89 points, so page sizes can differ from one page to the next.
Margin is None (the default) or Narrow, which is 10 mm on each side. A margin can’t be larger than 25 percent of the page’s shorter side, so on A4 the full 10 mm applies, and only extremely long, narrow photos placed with Match photo size hit that limit.
Each photo is scaled to the largest size that fits inside the margin area while keeping its proportions, then centered on the page. Photos are never cropped or stretched, and a photo smaller than the area is enlarged to fit it. Enlarging spreads the same pixels over a bigger area, so a small photo may look soft in print. A transparent PNG is filled with a white background.
With Margin set to None and Match photo size chosen, each photo fills its page. If your form requires A4 paper, choose A4 portrait or A4 landscape, because every page then has the same size.
How to change the photo order, including with the keyboard
You can’t drag photos in the list. Each row has an up arrow (↑) and a down arrow (↓) that move the photo one step, plus an ✕ button at the right end of the row that removes it. New photos go to the end of the list, so move them into place, and remember that changing the order clears the PDF result you already made.
The arrows are ordinary buttons, so the keyboard works too. Each button’s label includes the file name, so a screen reader announces which photo it will move.
- Press Tab until the up or down arrow of the photo you want to move is focused.
- Press Enter or Space to move the photo one step.
- After a move, focus stays on the same arrow of the same photo, so pressing Enter again keeps moving it.
- When the photo reaches the top or bottom of the list, the arrow that can’t move it any further is disabled. Focus is not moved automatically, so press Tab to reach another control and keep going.
What happened in a test run
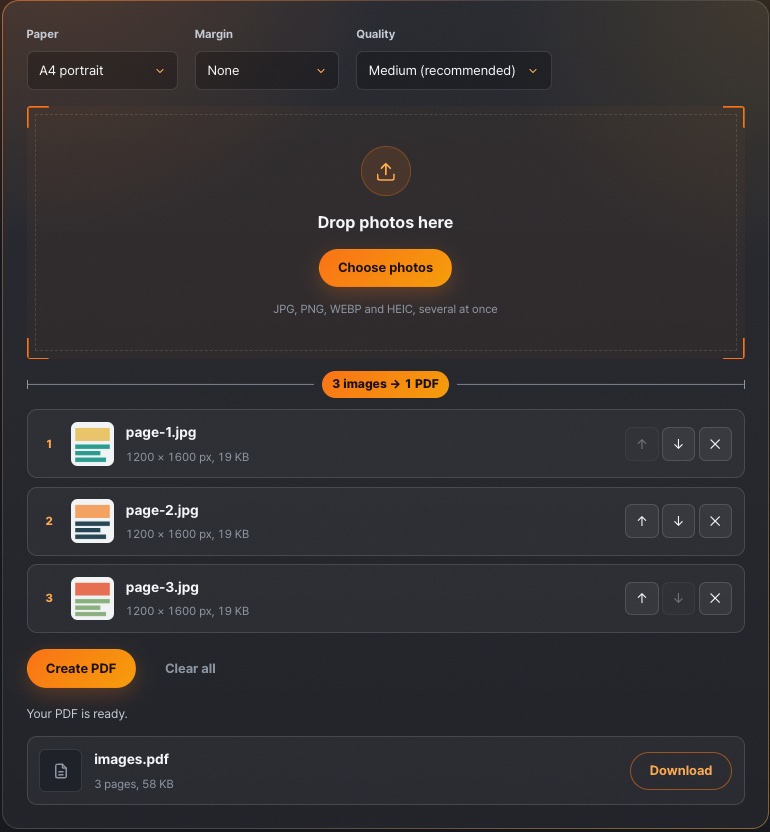
We combined three document-style sample images, each 1200 × 1600 pixels and 19 KB, with the default settings (A4 portrait, no margin, Medium quality). The result was one PDF with 3 pages and 58 KB.
The result list shows the page count and the file size together. Check first that the page count matches the number of photos you added, which shows at once whether one is missing. If the order is wrong, change it with the arrows in the list and create the PDF again.
How quality and photo resolution change file size
Quality has three levels: High (sharpest), Medium (recommended, and the default) and Low (smallest file). The long side of each photo is limited to 3,508 px at High, 2,339 px at Medium and 1,654 px at Low, and the JPG quality is set to 0.92, 0.85 and 0.75 respectively. The 3,508 px and 2,339 px limits match 300 dpi and 200 dpi on the long side of A4 paper.
The limit shrinks only photos whose long side exceeds it, and smaller photos keep their pixel size. So if your original photos are small, a lower quality level mainly increases JPG compression instead of reducing pixels. Paper and margin don’t change the photo data, so they don’t help reduce file size.
Each photo gets its own page and its own JPG, so the file grows with the number of photos. Every photo is saved again as a JPG, so the final size can differ from the total size of the original files. The exact size depends on your photos, so check the page count and size in the result row after you create the PDF.
- Lower the quality by one step, from High to Medium or from Medium to Low.
- Press Create PDF again, since changing an option clears the previous result, and check the size in the result row.
- If the file is still too large, remove photos you don’t need and create the PDF again.
- If creating the PDF fails, lower the quality or use fewer photos. You can also make separate PDFs from groups of photos and join them with the PDF merge tool.
Checks before you submit
The result row shows only the file name, page count and file size, with no preview, so open the finished PDF and check it yourself. FileFit processes your photos in your browser and doesn’t send them to a server.
The photos are placed in the PDF as images, so text inside them can’t be selected or searched, and FileFit doesn’t offer text recognition (OCR). If a form needs searchable text, first confirm whether it accepts a PDF made of photos.
- Check that the page count in the result row matches the number of photos you need, since a file that couldn’t be opened is left out.
- Page through the PDF from page 1 and check that the order matches what the form requires.
- Check that every page is upright and no photo is sideways.
- At Low quality, small text in a photo can look blurry, so check that it still reads clearly.
- Check the file size limit and file type in the submission instructions, and lower the quality and create the PDF again if the file is too large.
- Download the PDF before you close the page, because the result is not kept after that. One photo is saved with its original file name (without the extension) followed by .pdf, while several photos are saved as images.pdf, so rename it if the form asks for a specific name.