Why some HEIC photos won’t open
Apple says the High Efficiency camera format saves photos as HEIF, which uses less storage than JPEG at the same visual quality. FileFit recognizes HEIC photos by their .heic or .heif extension, and also by the file type or the format signature at the start of the file.
Microsoft documents a Windows 10 case in which HEIF and HEVC files can’t be shown in the Photos app’s Video Editor, with the message “You need an extension to use this file.”
An upload form may reject HEIC even if your device can open it. For example, Microsoft’s account picture guidance explicitly says HEIC files are not supported. Convert to JPG when the form does not accept HEIC, and first check the receiving site’s latest instructions for accepted formats and file sizes.
Shooting in a more compatible format
To shoot in a more compatible format from the start, change the camera format. Apple says Most Compatible makes new photos and videos use JPEG or H.264, and that this option appears only on devices that can record HEIF or HEVC.
- Open Settings and tap Camera.
- Tap Formats, then tap Most Compatible.
Exporting or transferring photos you already took
Apple says HEIF or HEVC media imported over USB from an attached iPhone or iPad into Photos, Image Capture, or a PC may be converted to JPEG or H.264. To keep the originals, open Settings, tap Apps, tap Photos, scroll down, and tap Keep Originals.
To convert on a Mac yourself, open the HEIF image in Photos or Preview, choose File > Export, then choose JPEG or PNG before saving. Apple also says AirDrop, Messages, and email may share the media in a more compatible format, such as JPEG or H.264, if the recipient’s device doesn’t support the newer format.
How to convert HEIC to JPG with FileFit
Conversion runs inside your browser with JavaScript, and FileFit does not send your photos to a server. The HEIC decoder loads only when the browser can’t open HEIC on its own, so the first conversion may take a little longer.
Photos are converted one at a time, and the status line shows which photo is being converted. Changing the format or quality converts the photos you added again with the new setting, and the ZIP file (filefit-converted.zip) stores the converted photos without compressing them again. Photos with the same name get a number such as “(2)” in the ZIP.
When a photo fails, its row shows the reason. The messages cover a file that isn’t HEIC, a file that is damaged or can’t be opened in this browser, and a failure that may be caused by low device memory. If memory may be the problem, add the photos in smaller groups, and download the results before you close the page.
- Choose the output format. JPG is the default, and PNG is also available.
- If you chose JPG, choose a quality setting. High is the default, with Medium and Smaller file also available.
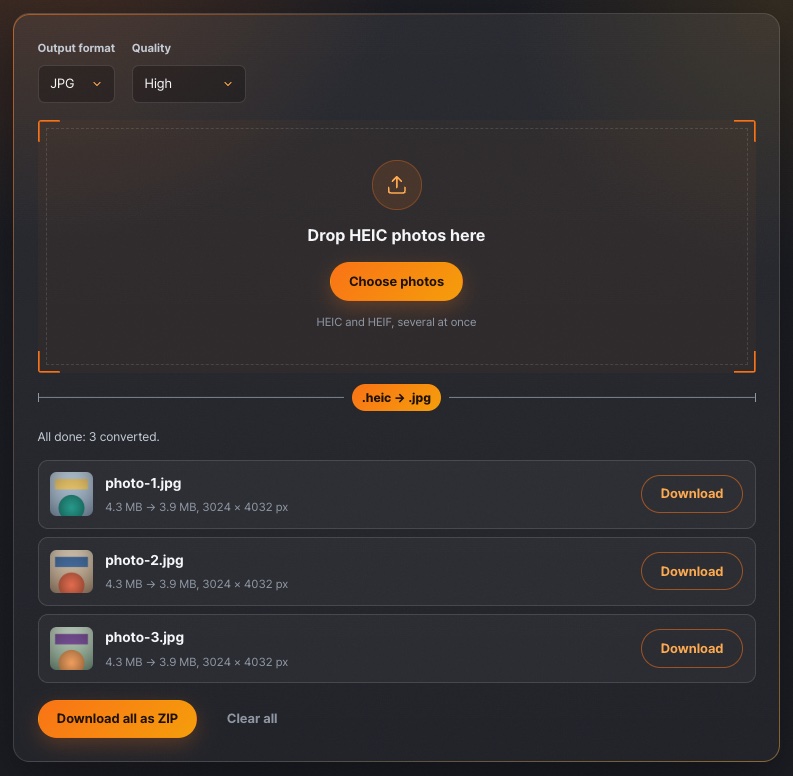
- Drop HEIC photos onto the tool’s drop area or press Choose photos. Conversion starts as soon as you add them, and you can add several at once.
- Check each result for its preview, the file size before and after, and its width and height in pixels.
- Download each photo, or choose Download all as ZIP if two or more photos converted successfully.
What changes during conversion
JPG is a lossy format, so it loses some quality when it is saved. FileFit passes 0.92 for High, 0.85 for Medium, and 0.75 for Smaller file to the browser’s encoder, and lower values make the file smaller while losing more detail.
PNG ignores the quality setting and saves the image drawn on the canvas without additional lossy compression. This does not restore compression loss in the HEIC source or prevent large photos from being resized. It can make a photo larger than a JPG. JPG has no transparency, so any transparent area is filled with white before saving.
Photos with 16,777,216 pixels or fewer (4,096 × 4,096 px) keep their original size. Larger photos are scaled down with their proportions kept; for example, a 6,000 × 4,000 px photo becomes 5,017 × 3,344 px (a calculated example).
The photo is redrawn on a canvas and saved as a new file, so metadata such as the date taken, location (GPS), and camera details is not carried over. If you need that information later, keep the original HEIC file as well.
The result file has no separate rotation value, so it keeps the orientation of the pixels as they were drawn on the canvas. After converting, check the photo’s orientation in the result preview.
What happened in a test run
We saved three generated sample images (no people, just shapes and noise) as HEIC with the Mac’s sips command and converted them with FileFit in a Chrome-based browser on a Mac mini (M1). Each original was 3024 × 4032 pixels and 4.3 MB. Every time we changed the format or quality, the three photos were converted again with the new setting, and each round took about 5 seconds.
All four settings kept the 3024 × 4032 pixel size and changed only the file size. Even High came out smaller than the original HEIC, because this noisy sample made a fairly large HEIC: it was only about 16% smaller than the same sample saved as a quality 85 JPG. For a photo whose HEIC is much smaller than a JPEG, as Apple describes, converting to JPG can make the file larger than the original.
For photos you plan to upload, Medium is a good first choice: it kept the pixel size and was about 35% smaller than High (3.9 MB → 2.6 MB). PNG became 15 MB, about 3.5 times the original HEIC, which does not suit upload forms. If the receiving site has a size limit, convert to JPG first and then fit the file with Compress image to KB.
| Output format | Quality setting | Result size | Compared with the HEIC |
|---|---|---|---|
| JPG | High (0.92) | 3.9 MB | About 91% |
| JPG | Medium (0.85) | 2.6 MB | About 59% |
| JPG | Smaller file (0.75) | 1.5 MB | About 35% |
| PNG | No quality setting | 15 MB | About 3.5× |
Checking HEIC photos on Windows and Mac
Apple says you need macOS High Sierra 10.13 or later to fully view and edit HEIF and HEVC media, so check your Mac’s version first. If your Mac runs an older version, check whether it can be updated before you rely on it.
This Microsoft guidance is written for Windows 10. If the Photos app on Windows 10 says a HEIF or HEVC file can’t be used, Microsoft says both HEIF Image Extensions and HEVC Video Extensions are required, even if you only work with photos. HEIF Image Extensions is listed as free, while HEVC Video Extensions is listed as paid.
- Install HEIF Image Extensions from Microsoft Store.
- Install HEVC Video Extensions from Microsoft Store. This one is paid.
- Restart the Photos app, then open the HEIC photo again. If it still won’t open, convert it to JPG with FileFit and check the JPG.